Adding a wishlist button to your WooCommerce store is one of the easiest and most effective ways to improve the shopping experience for your customers. This simple yet powerful feature allows shoppers to save products they like and revisit them later.
Often, customers aren’t ready to purchase immediately but want to keep track of their favorite products. By integrating a wishlist function into your WooCommerce store, you help customers keep tabs on the items they love without cluttering their shopping carts.
Wishlists also make it easier for customers to share their favorite items with friends or family, especially during holidays or special occasions. As a result, this feature increases engagement, drives repeat visits, and ultimately boosts sales.
In this article, we’ll walk you through the steps to add a wishlist button to WooCommerce using a plugin.
Let’s dive in!
Does WooCommerce have a Wishlist?
By default, WooCommerce does not have a built-in wishlist feature. However, this doesn’t mean you’re out of options. WooCommerce is incredibly flexible, and one of its strengths lies in the vast number of plugins available to extend its functionality.
With the help of a plugin, you can easily add a wishlist feature to your store. These plugins allow customers to save items for later, share their wish lists with others, and return to complete purchases when they are ready.
Adding this feature to your WooCommerce store is not only simple but can be done in just a few clicks, giving you the power to enhance your store in no time.
Why Should You Add a Wishlist Button in WooCommerce?
Adding a wishlist button to your WooCommerce store offers numerous advantages that can help you grow your business. It’s a feature that both you and your customers will appreciate. Here’s why:
- Enhances User Experience: A wishlist allows customers to save products they are interested in without having to buy them right away. It offers a user-friendly way to return and complete a purchase at a later time.
- Increases Sales Opportunities: By enabling customers to save items, you encourage them to return to your store and purchase those items later. They may even buy more than they initially intended after saving multiple products.
- Reduces Cart Abandonment: Often, customers use the cart as a temporary holding space for products they are unsure about. A wishlist offers a better alternative, helping reduce cart abandonment by allowing users to store products elsewhere.
- Boosts Customer Retention: Having a wishlist keeps your customers coming back to your store. They can revisit their saved items, making it easier for them to complete purchases later on.
- Social Sharing: Wishlists can be shared with friends and family. Whether it’s for birthdays, holidays, or special events, customers can easily share their wishlist, driving new traffic and potential sales to your store.
- Provides Insight into Popular Products: Wishlists can give you valuable data on the products your customers are interested in. You can use this information to optimize your product offerings and inventory.
- Improves Marketing Campaigns: Once you know what products customers are saving to their wishlists, you can send targeted email campaigns reminding them to purchase the items they saved.
For this guide, we will use the WooCommerce Wishlist & Add to Favorite plugin. This plugin is easy to use and provides all the functionality you need to add a wishlist button to your WooCommerce store.
WooCommerce Wishlist & Add to Favorite Plugin
The WooCommerce Wishlist & Add to Favorite plugin is a versatile and user-friendly tool designed specifically to integrate wishlist functionality into your WooCommerce store. This plugin allows customers to save products they are interested in and even share their wishlist with others. It also provides store owners with useful analytics and insights, helping you track which products are popular among your customers.
Here’s a detailed look at the plugin’s main features:
- Simple Installation and Setup: The plugin can be installed quickly from your WordPress dashboard. Once activated, it integrates seamlessly with your WooCommerce store, allowing you to add wishlist functionality in minutes.
- Customizable Design: You can easily customize the appearance of the wishlist button to match your store’s design. Choose from different button styles, colors, and placements to ensure that it fits perfectly with your theme.
- Multiple Wishlist Creation: Customers can create multiple wishlists to organize their favorite items. This is especially useful during holiday shopping or for categorizing different types of products they are interested in.
- Shareable Wishlists: Customers can share their wishlists with others via email or social media, encouraging word-of-mouth marketing and attracting new visitors to your store.
- Seamless Ajax Integration: The plugin supports Ajax functionality, meaning customers can add items to their wishlist without refreshing the page, ensuring a smooth user experience.
- Mobile-Friendly: The plugin is fully responsive, making it easy for customers to add products to their wishlist while browsing on mobile devices. This ensures that mobile shoppers enjoy the same convenience as desktop users.
- Analytics Dashboard: The plugin provides detailed reports on how many times products are added to wishlists, giving you valuable insights into customer preferences and helping you plan your inventory and marketing strategies accordingly.
With these features, the WooCommerce Wishlist & Add to Favorite plugin is the perfect tool to add this highly-requested functionality to your WooCommerce store.
3 Easy Steps to Add Wishlist Button in WooCommerce
Let’s dive into the detailed step-by-step process for adding a wishlist button to your WooCommerce store using the WooCommerce Wishlist & Add to Favorite plugin. In just three steps, you can enhance your store’s functionality and improve the shopping experience for your customers.
Step #1: Create a Wishlist Page for Your WooCommerce Store
The first step in adding a wishlist to your WooCommerce store is to create a dedicated wishlist page. This page will act as the central hub where customers can view and manage the items they have saved.
- Go to WordPress Dashboard: Log in to your WordPress admin area and navigate to the Pages section.
- Add New Page: Click on the Add New button to create a new page.
- Name the Page: Title the page “ Favorite Products” or something similar. You can also add a brief description or introduction text explaining how customers can use the wishlist feature.
- Insert Shortcode: Many wishlist plugins will provide a shortcode that you can place on this page. For the WooCommerce Wishlist & Add to Favorite plugin, add this shortcode [wcxs-favourite-products] to display the customer’s wishlist.

- Publish the Page: Once you’ve set up the page with the shortcode and description, click Publish. Your wishlist page is now live and ready to be used.

Make sure to add the wishlist page to your site’s navigation menu, so customers can easily access their saved items. This step ensures that users can find and manage their wishlist without any hassle.
Step #2: Install the WooCommerce Wishlist & Add to Favorite Plugin
To enable the wishlist functionality, you need to install and activate the WooCommerce Wishlist & Add to Favorite plugin. Follow these steps:
- Purchase the Plugin: Visit CodeCanyon and purchase the WooCommerce Wishlist & Add to Favorite plugin.
- Log in to WordPress: After purchasing the plugin, log in to your WordPress admin dashboard.
- Navigate to Plugins: From the dashboard, go to “Plugins” and then click “Add New.”
- Upload the Plugin: Click “Upload Plugin” at the top of the page and select the .zip file you downloaded from CodeCanyon.
- Install and Activate: After uploading, click “Install Now.” Once the installation is complete, click “Activate” to start using the plugin.
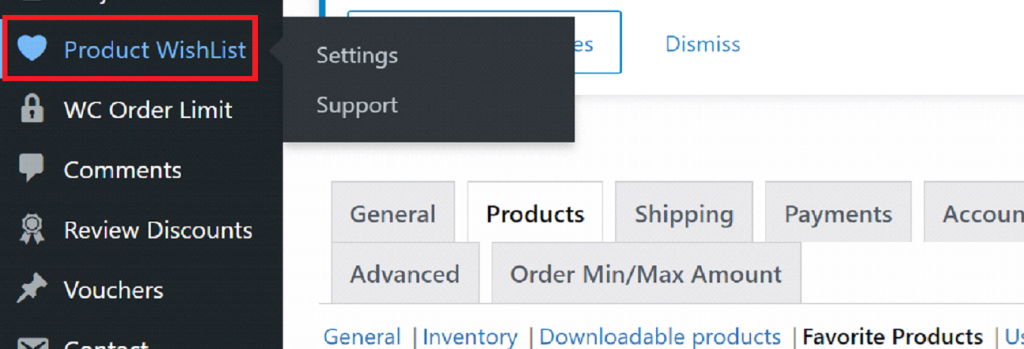
At this point, the wishlist functionality will be added to your WooCommerce store, and you can begin configuring it to suit your needs.
Step #3: Configure WooCommerce Wishlist Settings
After installing and activating the plugin, the next step is to configure its settings. The plugin provides two main sub-tabs for customization: Favorite Products and Users Favorite List. Let’s walk through each sub-tab and its key settings.
#1: Favorite Products Sub-Tab
This section lets you control how the wishlist feature functions in your WooCommerce store. Here are the essential settings:
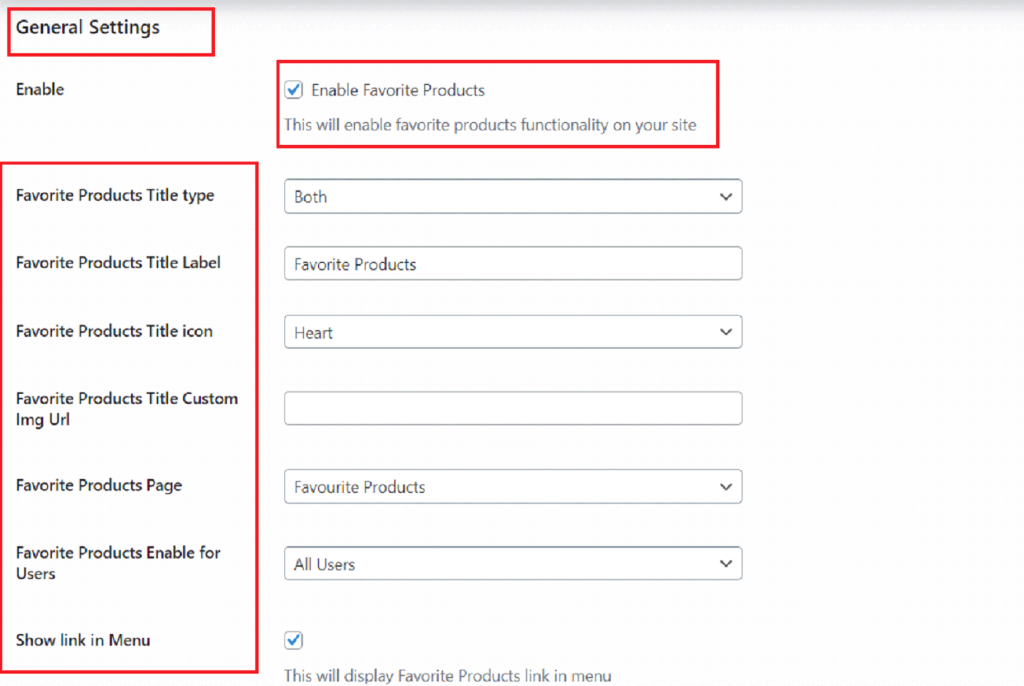
General Settings
- Enable Favorite Products: Check this box to activate the wishlist feature on your site.
- Favorite Products Title Type: Choose between a label, an icon, or both to represent the title of the favorite products section.
- Show Link in Menu: Display a link to the customer’s favorite products list in your site’s main menu.
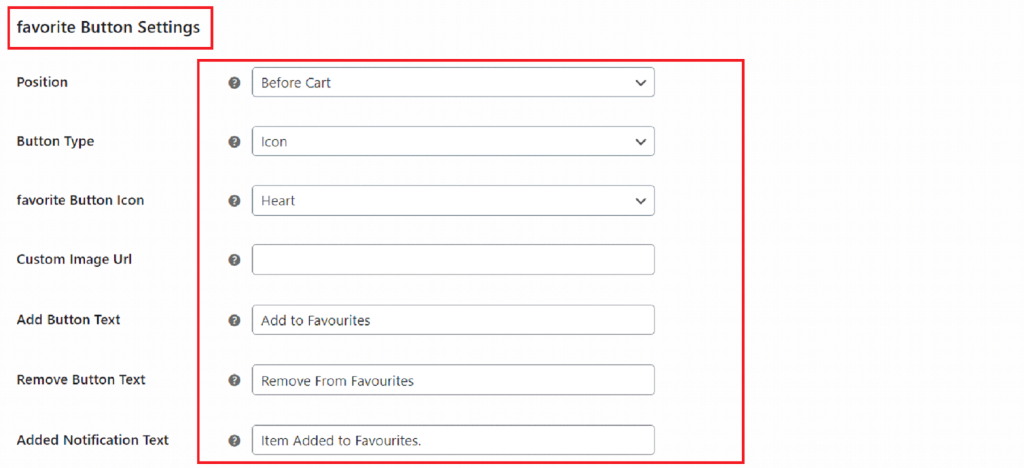
Favorite Button Settings
- Position: Choose where to display the “Add to Favorite” button—before or after the “Add to Cart” button, or before the product title.
- Button Type: Select whether to display the button as an icon, label, or both.
- Icon Customization: Choose from icons like a heart or star, or upload your custom icon for the button.
- Notification Text: Personalize the messages that show when items are added or removed from the wishlist.
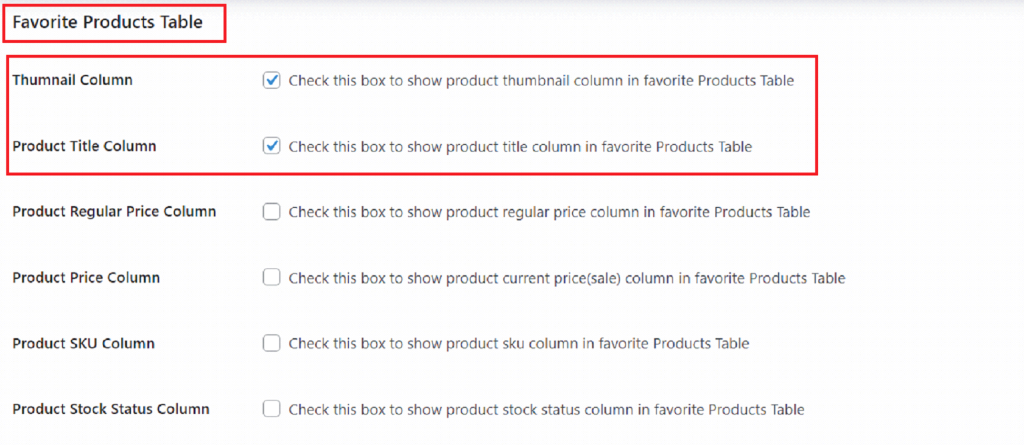
Favorite Products Table
- Thumbnail Column: Show product images in the favorite products table.
- Product Details: Display the product title, regular price, sale price, and stock status in the table.
Favorite Products Drawer
- Enable Drawer: Enable a drawer that allows users to view their favorite products from any page. You can also customize its appearance using custom CSS.
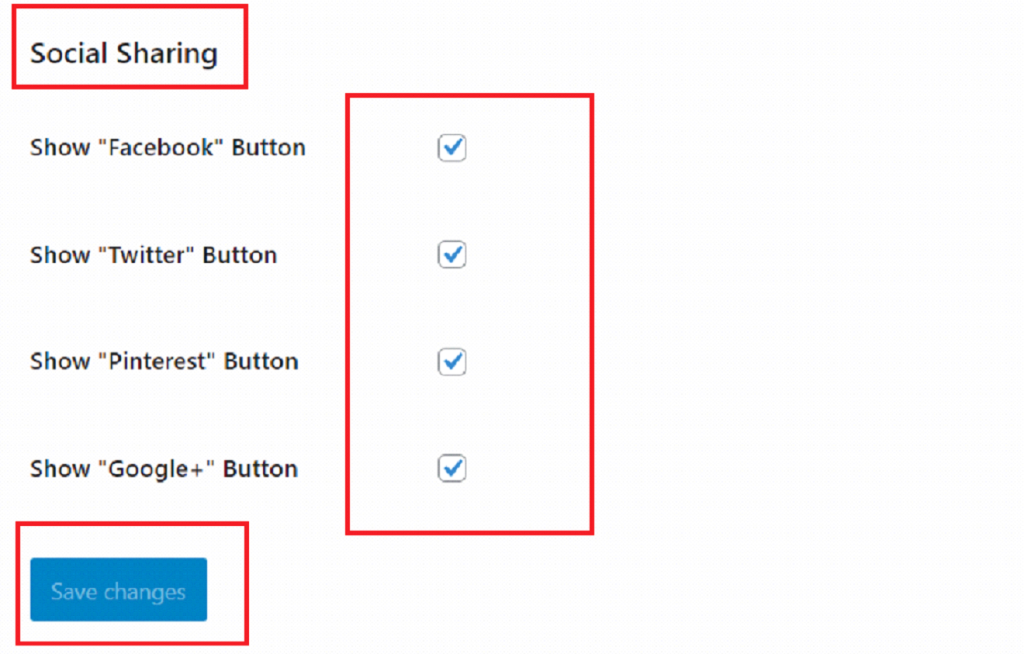
Social Sharing
- Enable Sharing Buttons: Add sharing buttons for social media platforms like Facebook, Twitter, Pinterest, and more.
#2: Users Favorite List Sub-Tab
This section manages how user-specific favorite lists are handled. Key settings include:
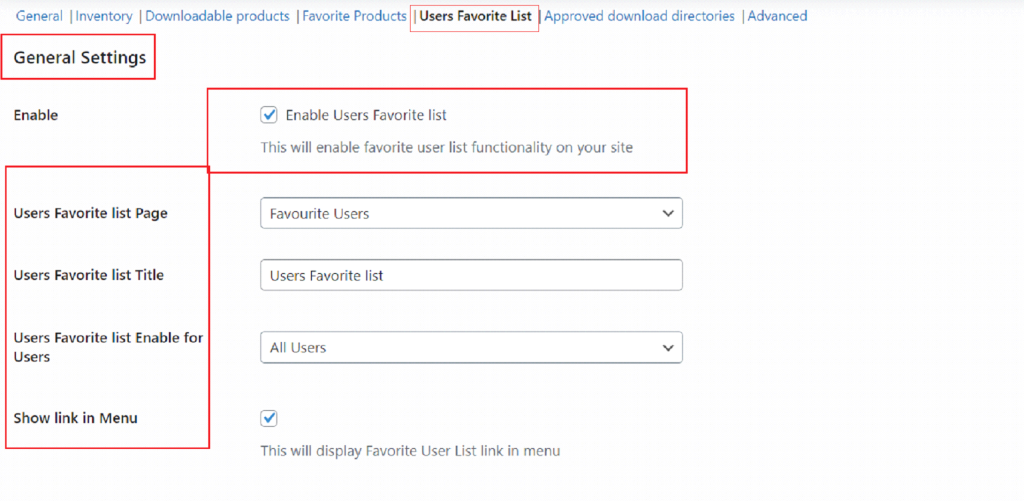
General Settings
- Enable User Favorite List: Allow users to create and manage their own favorite lists.
- Favorite List Page: Choose the page where the user’s favorite list will be displayed.
- Show Link in Menu: Add a link to the customer’s favorite list in your site’s main menu.
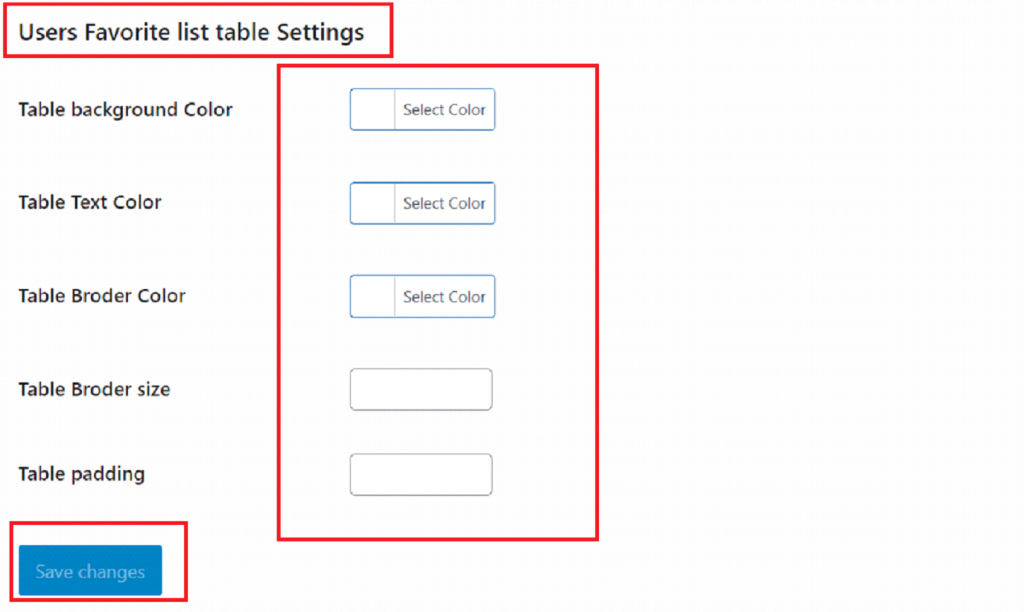
Users Favorite List Table Settings
- Table Colors: Customize the background, text, and border colors of the favorite list table.
- Table Layout: Adjust padding and border sizes for a clean look.
These settings will give you full control over how the wishlist button looks and operates in your store, ensuring that it fits seamlessly into the overall shopping experience.
Final Remarks
Adding a wishlist button to your WooCommerce store is a simple yet effective way to improve the customer shopping experience and increase your store’s sales. It encourages customers to save items for later, reduces cart abandonment, and even promotes social sharing.
Using the WooCommerce Wishlist & Add to Favorite plugin, you can implement this powerful feature in just three easy steps. Whether you’re looking to improve customer engagement, boost sales.
So, what’s holding you back? Download WooCommerce Wishlist & Add to Favorite plugin today!
