Running an online store means constantly communicating with customers through email, whether it’s order confirmations, shipping updates, or new product announcements.
But have you ever wondered what these emails actually look like to your customers? What if an email ends up in the spam folder, or worse, the customer doesn’t receive it at all?
That’s why it’s essential to preview and test your WooCommerce emails. Making sure your emails are visually appealing and properly formatted can have a direct impact on customer experience and brand trust.
In this guide, we’ll walk you through how to Preview and Test Your WooCommerce Emails to make sure they look exactly as intended before reaching your audience.
Ready? Let’s get started!
Why Should You Preview and Test Your WooCommerce Emails?
Email marketing is one of the most effective tools for eCommerce businesses. Your WooCommerce emails serve as more than just transaction records; they reflect your brand, your attention to detail, and your professionalism.
Ensuring the quality of your emails through previews and tests helps avoid any embarrassing mistakes or delivery issues. If your emails don’t look right or end up flagged as spam, you could lose valuable customer trust.
Here are some compelling reasons why you should Preview and Test Your WooCommerce Emails:
- Ensure Proper Formatting: Sometimes, email templates may not render correctly across different devices or email clients. Previewing helps you catch any formatting issues.
- Avoid Broken Links: Testing your emails can help you identify broken links that may lead to lost sales or customer frustration.
- Prevent Spam Flagging: Emails that don’t meet certain standards can end up in your customer’s spam folder. Testing ensures you comply with email best practices.
- Check for Typos and Errors: Catching spelling or grammar errors before an email is sent helps maintain a professional image.
- Optimize for Mobile Devices: With more people checking emails on their phones, it’s crucial to ensure your emails are responsive and look good on smaller screens.
- Test Personalization: If you use dynamic fields to personalize emails (e.g., customer names), testing ensures they populate correctly.
- Review Visual Appeal: You want your emails to look visually appealing, reflect your brand colors, and include clear calls to action.
To simplify the process, we’ll be using the Email Customizer for WooCommerce plugin to preview and test your emails effectively.
Email Customizer for WooCommerce Plugin
The Email Customizer for WooCommerce plugin is a powerful tool that allows you to customize your WooCommerce transactional emails without any coding. It comes with an intuitive drag-and-drop interface, making it easy for store owners to design and test emails. This plugin not only helps in creating attractive email templates but also allows you to preview and test them before going live, ensuring everything is on point.
Here are some of the standout features of the Email Customizer for WooCommerce plugin:
- Drag-and-Drop Interface: This feature allows you to easily move elements around to create the perfect email layout.
- Pre-Made Templates: Choose from a variety of pre-made templates that you can quickly customize to fit your brand.
- Real-Time Preview: See how your email will look as you design it, allowing you to make adjustments in real time.
- Mobile and Desktop Preview: Easily toggle between mobile and desktop views to ensure your emails look great on all devices.
- Custom Branding: Customize your emails with your brand’s colors, logo, and fonts to keep them consistent with your store’s identity.
- Test Emails: Send test emails to yourself to ensure everything looks perfect before sending them to customers.
- Compatibility: The plugin works seamlessly with all major WooCommerce extensions and email clients.
With these powerful features, you can ensure that your WooCommerce emails are not only functional but also visually appealing and aligned with your brand.
3 Easy Steps to Preview and Test Your WooCommerce Emails
Now that you know why it’s essential to test your WooCommerce emails, let’s dive into the three easy steps to preview and test them using the Email Customizer for WooCommerce plugin. By following this step-by-step guide, you can be confident that your emails will reach your customers as intended.
Step #1: Install the Email Customizer for WooCommerce
To preview and test your WooCommerce emails, you need to install the Email Customizer for WooCommerce plugin. This process is straightforward and can be completed directly from your WordPress dashboard.
- Purchase the Plugin: Head over to CodeCanyon, purchase the Email Customizer for WooCommerce Plugin, and download the .zip file.
- Log in to Your WordPress Dashboard: Once downloaded, log in to your WordPress admin panel.
- Go to Plugins: From the left-hand menu, click “Plugins” and select “Add New Plugin.”
- Upload the Plugin: Click on the “Upload Plugin” button at the top and select the .zip file you just downloaded.
- Install and Activate: After the upload, click “Install Now,” followed by “Activate.” Once activated, you’ll be asked to enter your license key.
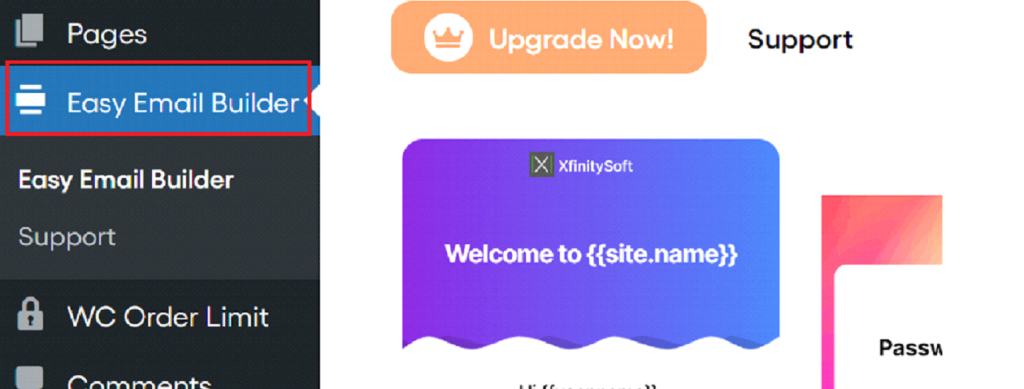
After activation, a new menu item called “Easy Email Builder” will appear in your dashboard. This is where you will start customizing your WooCommerce order emails.
Step #2: Choose the Email Template You Want to Customize
Once you’ve installed the plugin, the next step is to choose the specific email template you want to customize. WooCommerce offers several types of transactional emails, such as order confirmations, customer invoices, and shipping updates.
With the Email Customizer for WooCommerce plugin, you can easily modify any of these templates.
- Access the Plugin Settings: In your WordPress dashboard, click on the “Easy Email Builder” from the left-hand side menu.
- Select the Email to Customize: You’ll see a list of all the WooCommerce transactional emails. Select the one you want to customize (e.g., “Order Confirmation”).
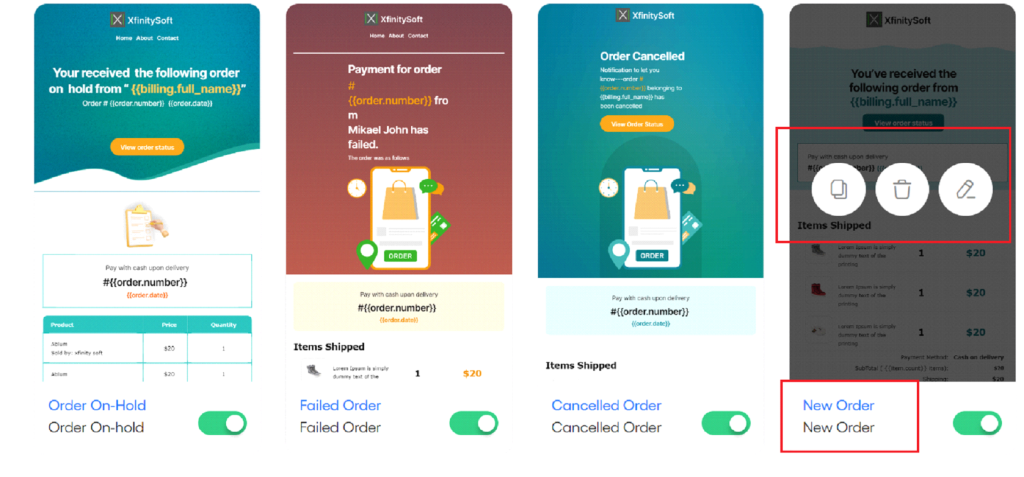
- Click ‘Customize’: Once you’ve chosen the email, click the “Customize” button to open the customizer interface.
- Use the Drag-and-Drop Editor: Use the drag-and-drop interface to rearrange elements, add images, or change text and colors to match your brand.
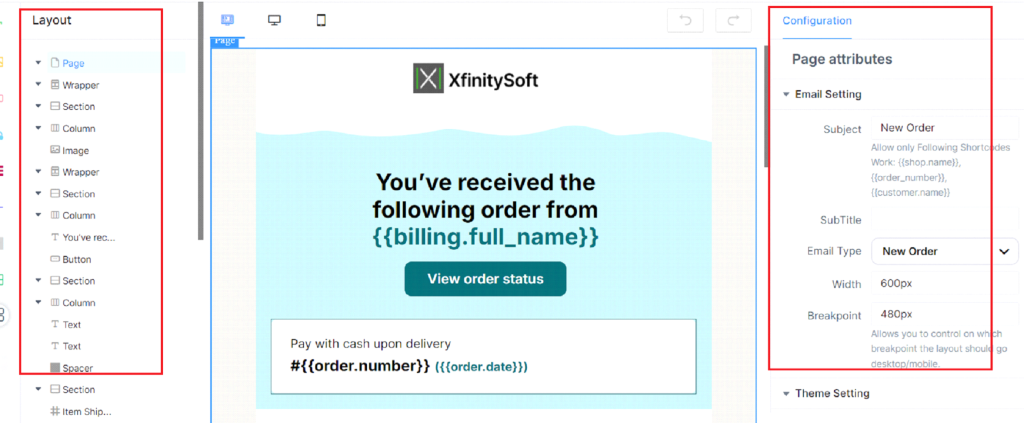
This customization ensures that your emails are not just functional but visually aligned with your brand identity.
Step #3: Preview and Test Your WooCommerce Email
Now that you’ve customized your email template, it’s time to preview and test it before sending it out to your customers. Testing is crucial to ensure everything looks and functions correctly.
- Preview the Email: In the email customizer, you’ll see a “Preview” button that allows you to view how the email will appear to your customers.
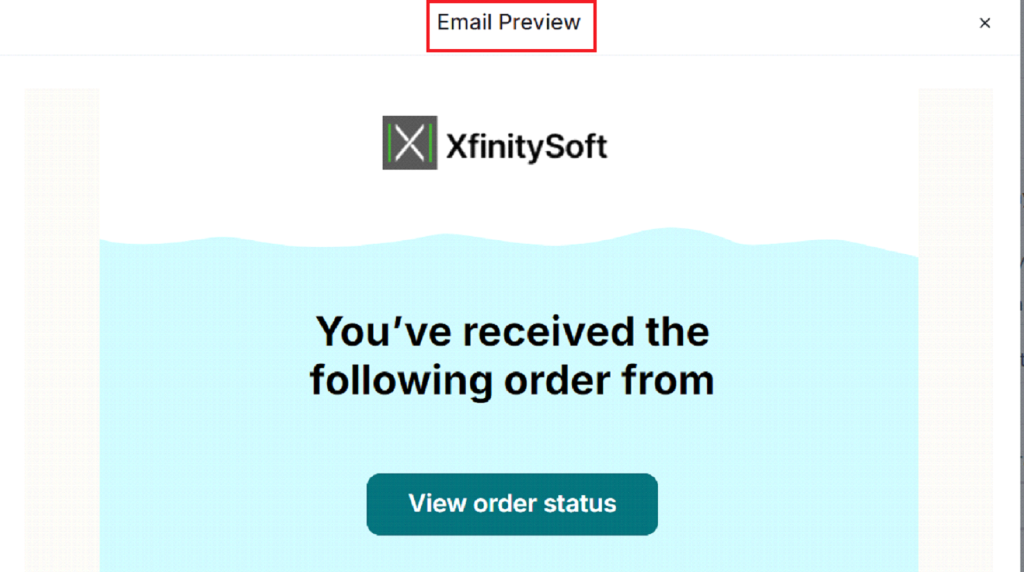
- Check Mobile and Desktop Views: Toggle between the mobile and desktop views to make sure your email looks great on all devices.
- Send a Test Email: Once you’re satisfied with the design, send a test email to your own email address by clicking the “Send Test Email” button.
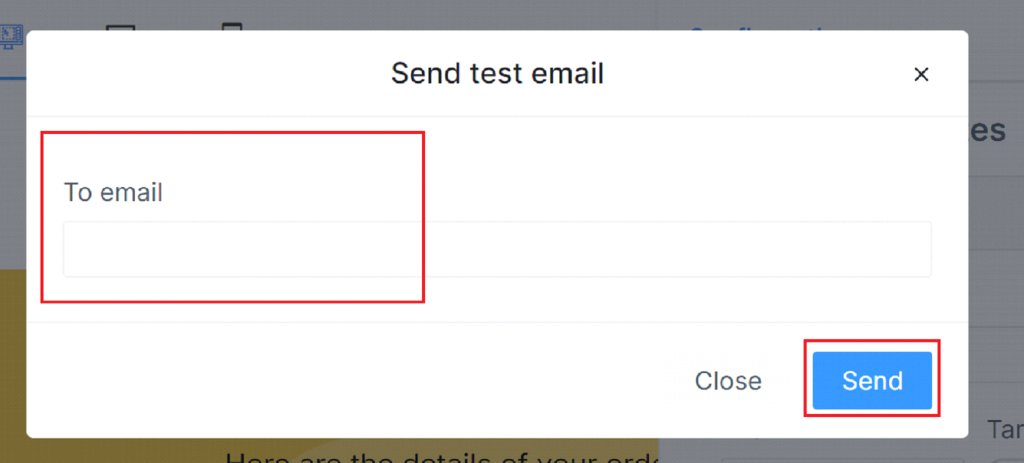
- Check for Formatting and Functionality: Open the test email on different devices and email clients (e.g., Gmail, Outlook) to ensure proper rendering.
- Verify Links and Images: Click on any links or images in the email to ensure they are working as expected.
Once you’re happy with how everything looks and functions, you’re ready to send the emails to your customers with confidence.
💡You might want to read this 👉 How to Customize WooCommerce Order Emails [3 Easy Steps]
Final Remarks
Previewing and testing your WooCommerce emails is a critical step to ensure a professional and consistent customer experience. By using the Email Customizer for WooCommerce plugin, you can easily create, preview, and test your transactional emails without any hassle.
These emails are a direct reflection of your brand, so taking the time to customize and test them helps build customer trust and increase engagement.
Download the Email Customizer for WooCommerce plugin and follow the steps outlined in this guide, and you’ll be well on your way to sending flawless WooCommerce emails every time.
