Looking for an easy way to optimize images for SEO in WordPress? If so, you’ve landed on the right page. Properly optimized images can drive more organic traffic to your site, enhance the user experience, and improve your rankings on search engines like Google.
Many website owners overlook the importance of image SEO, thinking that search engines can automatically understand the content of an image. However, this isn’t the case. Search engines rely on specific cues, such as alt tags and image titles, to determine what an image is about.
So, how can you ensure your images contribute positively to your SEO efforts? In this guide, we’ll walk you through two easy steps to optimize your images for SEO in WordPress.
Why Should You Optimize Images for SEO in WordPress?
Optimizing images for SEO is crucial for several reasons. Here are some key reasons why you should optimize images for SEO in WordPress:
- Improve Page Load Speed: Optimized images load faster, reducing the overall page load time and enhancing the user experience.
- Boost Search Engine Rankings: Search engines favor websites that load quickly and offer a good user experience, which can lead to better rankings.
- Increase Organic Traffic: Optimized images can appear in Google Image Search, attracting more visitors to your site.
- Enhance User Experience: Faster-loading images and proper alt tags improve accessibility, especially for users with visual impairments.
- Reduce Bounce Rate: Faster page loads keep users engaged, reducing the likelihood of them leaving your site quickly.
- Save Server Resources: Smaller, optimized images consume less server bandwidth, which can reduce hosting costs.
- Better Mobile Experience: Optimized images are essential for mobile users, as they ensure quicker load times on slower connections.
In this guide, we’ll use the SEO Image Optimizer plugin to optimize our images for SEO in WordPress. This plugin simplifies the process, allowing us to optimize our images with just a few clicks.
SEO Image Optimizer for WordPress and WooCommerce
The SEO Image Optimizer plugin is an essential tool for anyone looking to boost their image SEO on WordPress and WooCommerce sites. This plugin is designed to automatically add optimized alt and title tags to your images, ensuring that search engines can easily understand and index them. Whether you have a blog, a WooCommerce store, or any other type of website, this plugin can help you increase your traffic and sales from search engines like Google, Yahoo, and Bing.
Features of the SEO Image Optimizer Plugin:
- Automatically Add Alt and Title Tags: The plugin dynamically replaces alt attributes and title tags based on the image name, post title, tags, and categories.
- Works for Existing and New Images: Whether you’re adding new images or optimizing existing ones, the plugin handles both with ease.
- WooCommerce Images Support: Optimize product images in WooCommerce, making them more search engine-friendly.
- Customizable Alt and Title Tags: You can choose to replace alt attributes with image names, post titles, or custom values.
- User-Friendly Interface: The plugin is easy to use, allowing you to optimize all your images in just a few seconds.
- Theme and Browser Compatibility: It works with most WordPress themes and is compatible with all major browsers.
- Feature Image Support: Override the alt tags of featured images with post titles for better SEO.
- Exclude Specific Content: The plugin allows you to exclude certain posts, pages, or product types from optimization, giving you full control.
Now that you understand the importance of optimizing images and the capabilities of the SEO Image Optimizer plugin, let’s dive into the two simple steps to get started.
2 Easy Steps to Optimize Images for SEO in WordPress
In the following steps, we’ll guide you through installing the SEO Image Optimizer plugin and configuring its settings to optimize your images for SEO effectively.
Step #1: Install and Activate the SEO Image Optimizer Plugin
The first step is to install and activate the SEO Image Optimizer plugin. Follow these detailed instructions to get started:
- Purchase the Plugin: First, visit the CodeCanyon website to buy the SEO Image Optimizer plugin.
- Log in to WordPress: Access your WordPress dashboard by logging in with your credentials.
- Navigate to Plugins: In the WordPress dashboard, find the “Plugins” menu on the left-hand side and click on “Add New Plugin.”
- Upload the Plugin: Click the “Upload Plugin” button at the top, then select the “.zip” file of the plugin you’ve got on your welcome email.
- Install the Plugin: Once the file is selected, click “Install Now” to start the installation process.
- Activate the Plugin: After the installation is complete, click “Activate” to enable the plugin on your site. You will be prompted to enter the license key that you received upon purchase.
- Access the Plugin Settings: Once activated, a new menu item called “SEO Image Optimizer” will appear in your WordPress dashboard, where you can start configuring the plugin settings.
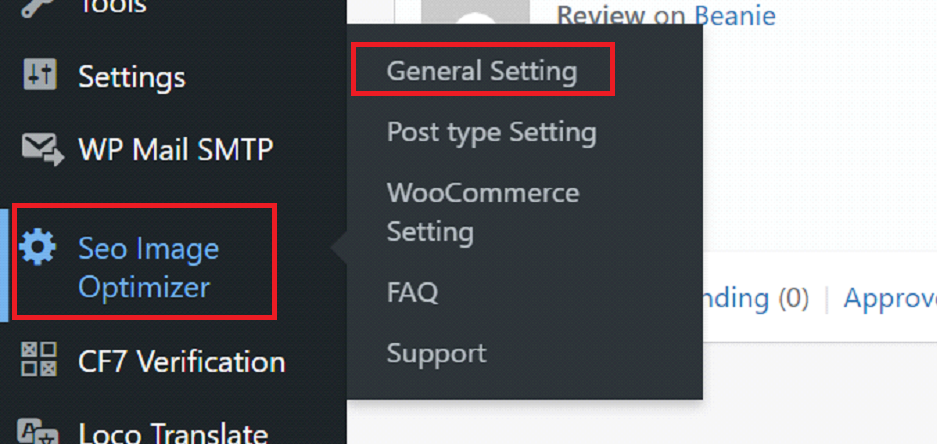
Step #2: Configure Your SEO Image Optimization Settings
After installing and activating the plugin, the next step is to configure the settings to optimize your images. The SEO Image Optimizer plugin offers several settings sections, each with its own sub-sections and fields. We’ll walk you through these settings one by one.
#1: General Settings:
In the General Settings section, you can set the default values for the alt and title tags that will be automatically applied to your images.
- Alt Attribute Value: Choose what the alt tag should be replaced with. Options include the image name, post title, post categories, or post tags.
- Override Existing Alt Tags: Decide whether to override existing alt tags with the new values. Select “Yes” to enable this feature.
- Title Attribute Value: Similar to the alt attribute, you can choose the replacement value for the title tag.
- Override Existing Title Tags: Enable this option to replace any existing title tags with new ones.
- Override Feature Image Alt Tags: This option allows you to override the alt tags of featured images with post titles, ensuring consistency across your site.
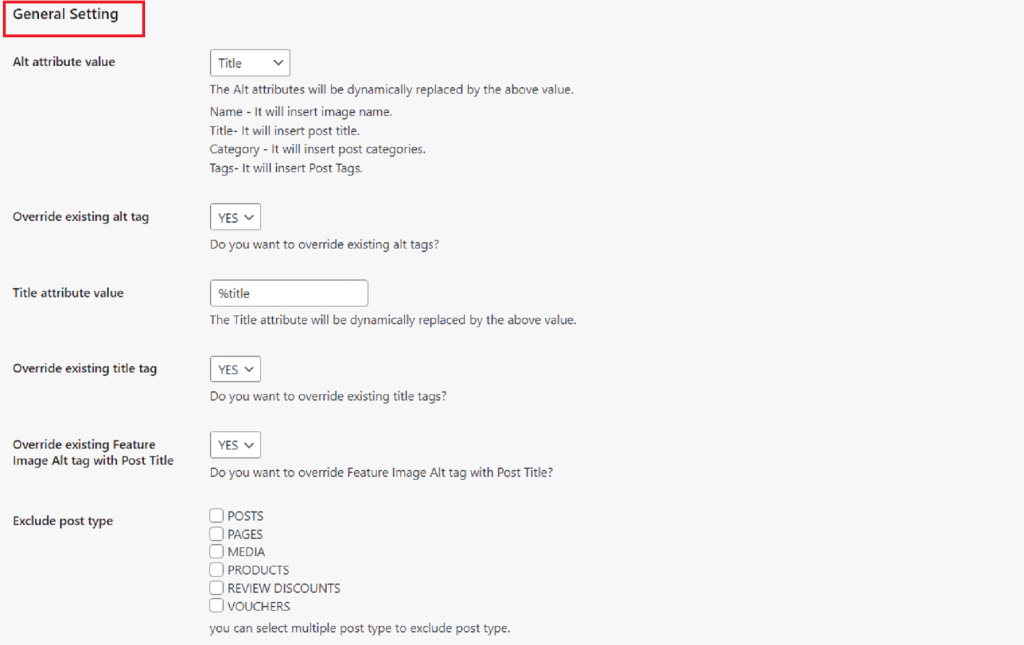
Once you’ve configured these settings, click “Save Changes” to apply them.
#2: Post Type Settings:
In this section, you can control how the plugin interacts with different post types on your site.
- Exclude Posts: If there are specific posts you don’t want the plugin to optimize, you can exclude them here.
- Exclude Categories: Similar to posts, you can exclude certain categories from being optimized.
- Exclude Tags: This option allows you to exclude posts with specific tags from being optimized.
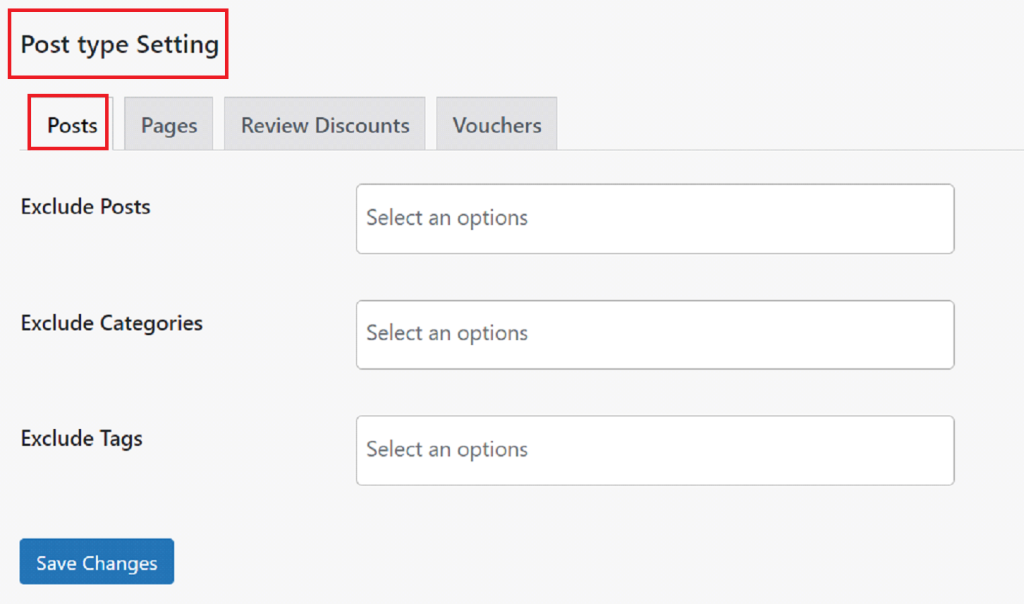
You can also exclude the pages, review discounts, and vouchers by navigating to other tabs.
After setting your preferences, don’t forget to click “Save Changes.”
#3: WooCommerce Settings:
If you’re running a WooCommerce store, this section allows you to optimize your product images.
- Optimize WooCommerce Images: Select “YES” to enable this setting to optimize alt and title tags for WooCommerce product images.
- Exclude Products: You can choose to exclude certain products from optimization if needed.
- Exclude Product Categories: Similar to posts, you can exclude specific product categories.
- Exclude Product Tags: If certain product tags should not be optimized, you can exclude them here.
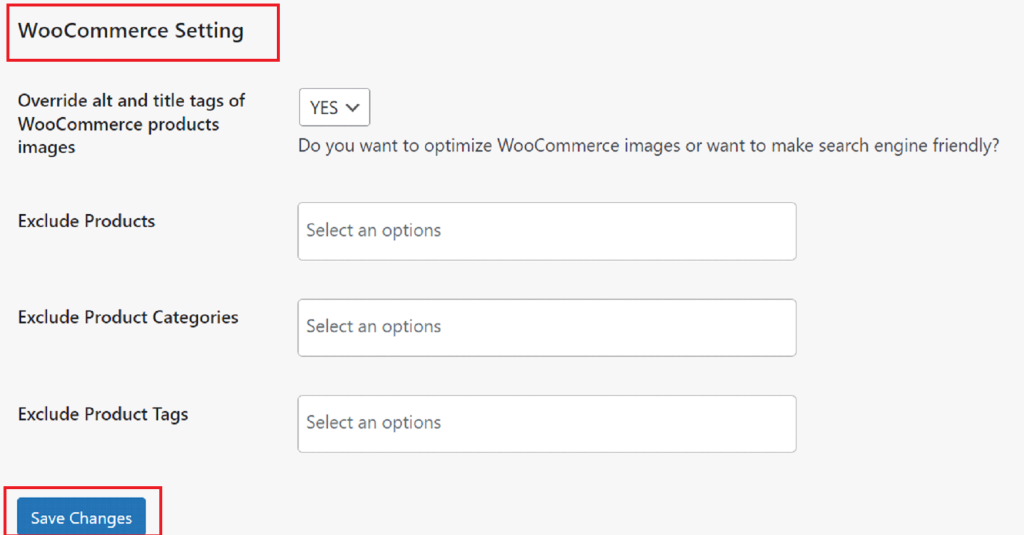
Click “Save Changes” once you’ve configured the WooCommerce settings.
Ending Remarks
Optimizing images for SEO in WordPress is not just a technical task; it’s a critical part of your overall SEO strategy. By following the two easy steps outlined in this guide and using the SEO Image Optimizer plugin, you can ensure that your images are working hard to drive traffic to your site.
Proper image optimization leads to faster loading times, better search engine rankings, and an improved user experience, all of which contribute to the success of your website. So, don’t wait—start optimizing your images today and watch your organic traffic grow!
Lastly, if you have any questions or need further assistance, feel free to reach out to our support team. We’re here to help!

